Use case: Application Integration
Suppose your company provides a LMS/DMS to car dealers, and you would like to integrate messaging into your software application. In particular, your application will reach out and listen to consumers over WhatsApp.
Specifically, you would like to send WhatsApp notifications to any of your customers' contacts when some event occurs in your system - for example to inform or remind the consumer, say, about an offer or appointment.
Also, you would like to receive WhatsApp consumer responses when a contact responds, so that you can show responses in your software and link to the full conversation at Web1on1.

Next steps:
- Create a chatbot Get started with the bot development guide.
- Send WhatsApp messages See Sending Messages chapter
- Process WhatsApp responses
1. Register your application
Any software integration (your conversational application) is registered in our system as a chatbot. The chatbot serves as a container for your application API token and webhook, and makes your application available to your customers (provided that they're also on the Web1on1 platform).
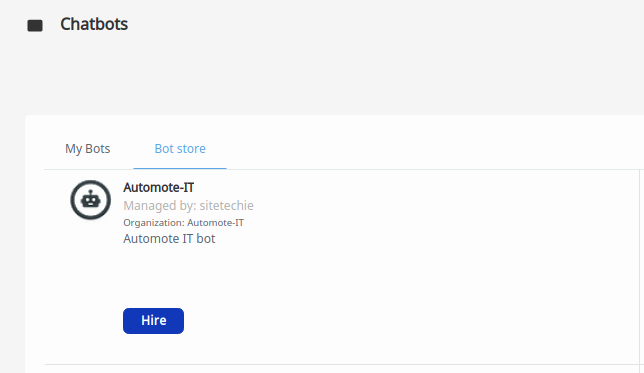
Car dealers (your customers) can then enable your application integration from the Web1on1 Bot Store, thereby giving your application permission to send and receive messages on their behalf.
Creating a chatbot
Create a new chatbot to represent your application integration towards your customer's organizations in the bot store.
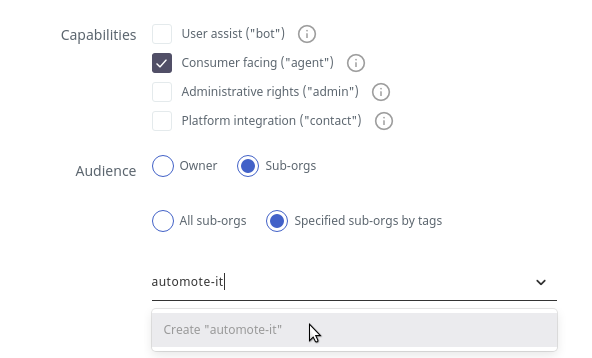
- Select the consumer facing capability so your application can exchange messages with consumers.
- Share your integration with organizations by setting a tag for your developer organization (here: 'automote-it'), provided to you by Web1on1.
2. Sending messages
All activity in conversations is recorded as messages. A message can be a chat message, a command, a form action, or any of the other message types.
Through messages, we will be doing the following actions:
- Set a contact's name and phone number
- Set the contact licenseplate and location
- Send a WhatsApp template to the contact
- Subscribe to future contact messages
Generating an authentication token
To use the messaging API, you will need to authenticate using a Bearer token. Click the 'API token' tab in your bot details, and generate an authentication token for your bot. Click the clipboard icon to copy it.
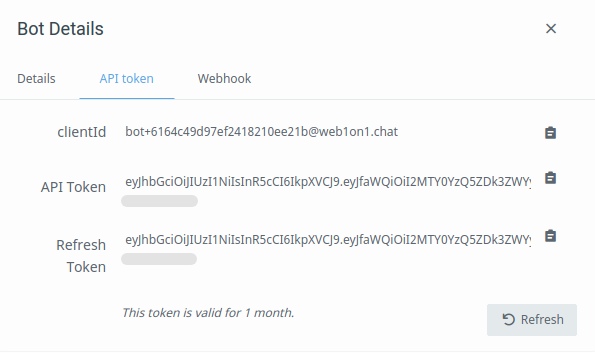
You can now make API calls, by using this as the 'Bearer' token in the Authorization header of http requests.
API tokens expire after 1 month, refresh tokens are valid for 3 months. You should implement a cron job (or use the SDK) to handle renewals.
Review the Authentication Guide for more info on refreshing authentication tokens.
Adding messages to a conversation
If your application keeps track of conversation IDs for organization contacts, it's efficient to post to the conversation directly:
Insert or Update a conversation (Upsert)
If, however, all you have is a phone or email, to send one or more messages to an organization's contact you can use the Upsert capabilities of the conversations endpoint. If a contact conversation doesn't exist yet, it will be created.
This endpoint accepts messages for a contact by phone or email.
What is an upsert?
An upsert is a technique to insert or update a record using a single statement. If the record is already present, it gets updated. If not, the record is inserted.
Note that, when creating or updating a contact conversation:
- The organization id is required.
- The contact.profile needs to have at least an
emailaddress or atelephonenumber.
In addition to the contact profile, the request payload needs to have at least one message provided in the messages property.
Example
Your software application would send a WhatsApp Template message on behalf of one of your customer's organization, "Acme Demo" with ID "5e8493ba4d84280011860499".
The WhatsApp Template is owned by Acme, and has the ID "609a61ec5b25a7001e2fedce" and the following content:
Dear {{contact.name}},
You have an appointment tomorrow at {{PlanTime}}. We would like to keep in touch via WhatsApp.
In the 3 messages of the sample payload below, we will:
- set the license plate
- set the location
- send a WhatsApp templated message to the contact
In this example, the consumer is supplying the contact identifier, a telephone number. The API will check for an existing contact and conversation and, if found, update the resource representation to what has been provided and return a 200 OK response code. If the resource is not found, then it is created using the identifier provided and return a 201 CREATED response code.
Making this API call will create the contact if necessary, and start/resume the conversation by sending the WhatsApp message to the contact.
Method 1: HTTP Request
One POST request to the /conversations is all you need. If the contact doesn't exist, it will be created.
Request: POST https://api.web1on1.chat/v2/conversations
Authorization: Bearer YOUR-TOKEN
Content-Type: application/json
{
"organization": "5e8493ba4d84280011860499",
"type": "contact",
"contact": {
"profile": {
"name": "John Johnson",
"telephone": "+31619626759"
}
},
"messages": [{
"type": "field",
"text": ".licenseplate XX-99-WZ"
}, {
"type": "field",
"text": ".location 3204"
}, {
"text": "appointment_24_hours_before",
"role": "agent",
"touchpoint": "whatsapp",
"type": "chat",
"meta": {
"template": "609a61ec5b25a7001e2fedce",
"PlanTime": "3.15 pm"
}
}]
}Method 2: SDK Recipe
Use our SDK ('chipchat') in your JavaScript code, and simply call bot.conversations.create with the above payload. Here's a comprehensive example:
const Bot = require('chipchat');

const bot = new Bot({
  token: process.env.TOKEN
});

bot.conversations.create({
    "organization": "5e8493ba4d84280011860499",
    "type": "contact",
    "contact": {
        "profile": {
            "name": "John Johnson",
            "telephone": "+31619626759"
        }
    },
    "messages": [{
        "type": "field",
        "text": ".licenseplate XX-99-WZ"
    }, {
        "type": "field",
        "text": ".location 3204"
    }, {
        "type": "chat",
        "text": "appointment_24_hours_before",
        "role": "agent",
        "touchpoint": "whatsapp",
        "meta": {
            "template": "609a61ec5b25a7001e2fedce",
            "PlanTime": "3.15 pm"
        }
    }]
}).then((conversation) => {
  console.log('Message sent to' + conversation.name);
  console.log('Conversation:',
    JSON.stringify(conversation, null, 4)
  );
}).catch((error) => {
  console.log('error', error);
});
Common environment variables in our recipes are EMAIL, SECRET and REFRESHTOKEN. Review the SDK Quickstart for detailed information.
3. Receive WhatsApp responses
Write and run your webhook handler
Start out by setting up and registering a webhook: a http endpoint on your system, to receive messages from Web1on1 on. A webhook can only be activated if it passes verification - so you'll need a working public endpoint. An online IDE like repl.it and our SDK make this straightforward.
See the Webhooks guide for detailed documentation and examples of webhook payloads.
Filter WhatsApp messages
It's easy to filter on WhatsApp consumer messages for further processing. As a full example, take a look at the following code:
const express = require('express');
const Bot = require('chipchat');

const app = express();

const bot = new Bot({
  secret: process.env.SECRET
});

// trigger on event: resource.operation.convType.msgType.role
bot.on('message.create.contact.chat.contact',
  // filter on touchpoint
  { touchpoint: 'whatsapp' },
  (message, conversation) => {
    console.log('WhatsApp msg', message.text);
    //.. do something with the message...
  }
);

// Set up webhook URL; for example
// https://webhook-processor.web1on1.repl.co/webhook
app.use('/webhook', bot.router());

app.get('/', (req, res) => {
  res.send('A simple Web1on1 webhook processor as an Express app, that logs a WhatsApp contact message.');
});

app.listen(443, () => {
  console.log('server started');
});
Run your webhook processor; it is now ready to be validated. To use this webhook processor, we will now set your endpoint as the Webhook URL in the webhook tab of the bot details panel.
Create a webhook in the bot details panel
Open your bot's details panel, and select the 'Webhook' tab.
Subscribe to webhook events
To receive all chat messages in contact conversations that your bot is following, subscribe to the corresponding message.create.contact.chat webhook event.
When creating a bot webhook for the first time, you can subscribe to groups of webhook events, like "all messages in contact conversations".
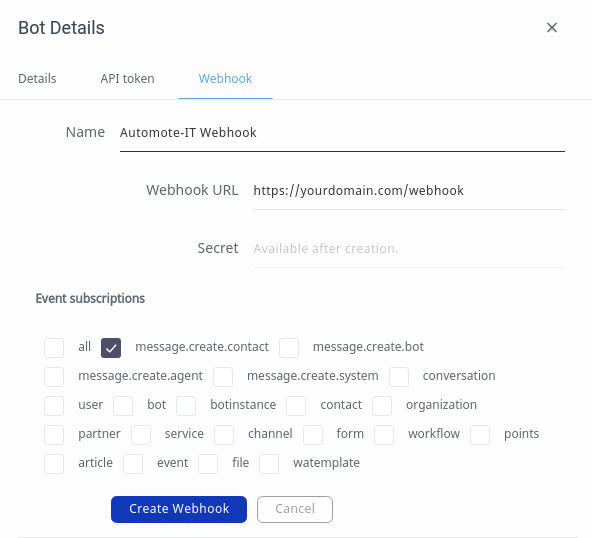
After the webhook is created, re-opening the details panel will show finer-grained subscription options. Select the 'chat' message type for contact conversations:
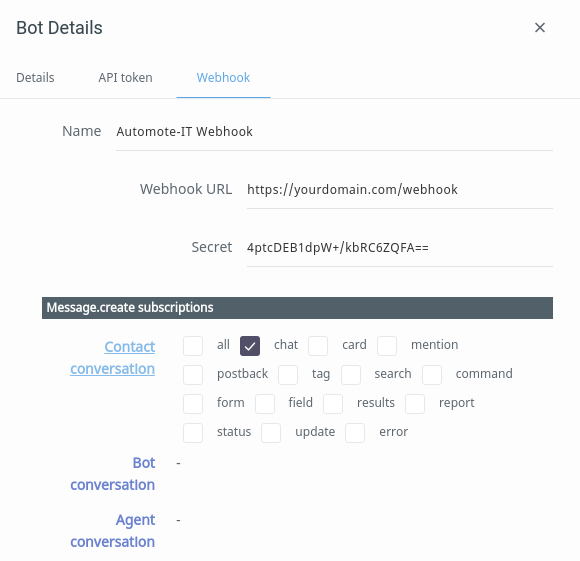
No other webhook subsriptions are needed for this use case. When the contact responds, your webhook will be notified of the message and conversation.
You should now see any WhatsApp contact messages being logged by your webhook processor.
4. Publishing your bot in the Bot Store
To facilitate your software integration, our Customer Support team will:
- Add your developer tag (here: 'automote-it') to our shared customers;
- Add your developer organization as a partner to all our shared customers.
Your application will be visible to all organizations that have your developer tag, and can now send and receive messages on behalf of any tagged organization that enables your integration (by hiring your bot in the bot store).
Next, let's explore some other ways to integrate with Web1on1.
