Enabling the widget
The Web Widget integration is used to show a chat window on the website of Organizations. When a consumer (someone visiting the site of the customer, also known as Contact) types a message in the widget for the first time, a new conversation will be created in Web1on1 and queued for the agents and/or bots to pick it up.
Enabling the Web Widget for your organization is done in two steps:
Step 1: Activate the integration
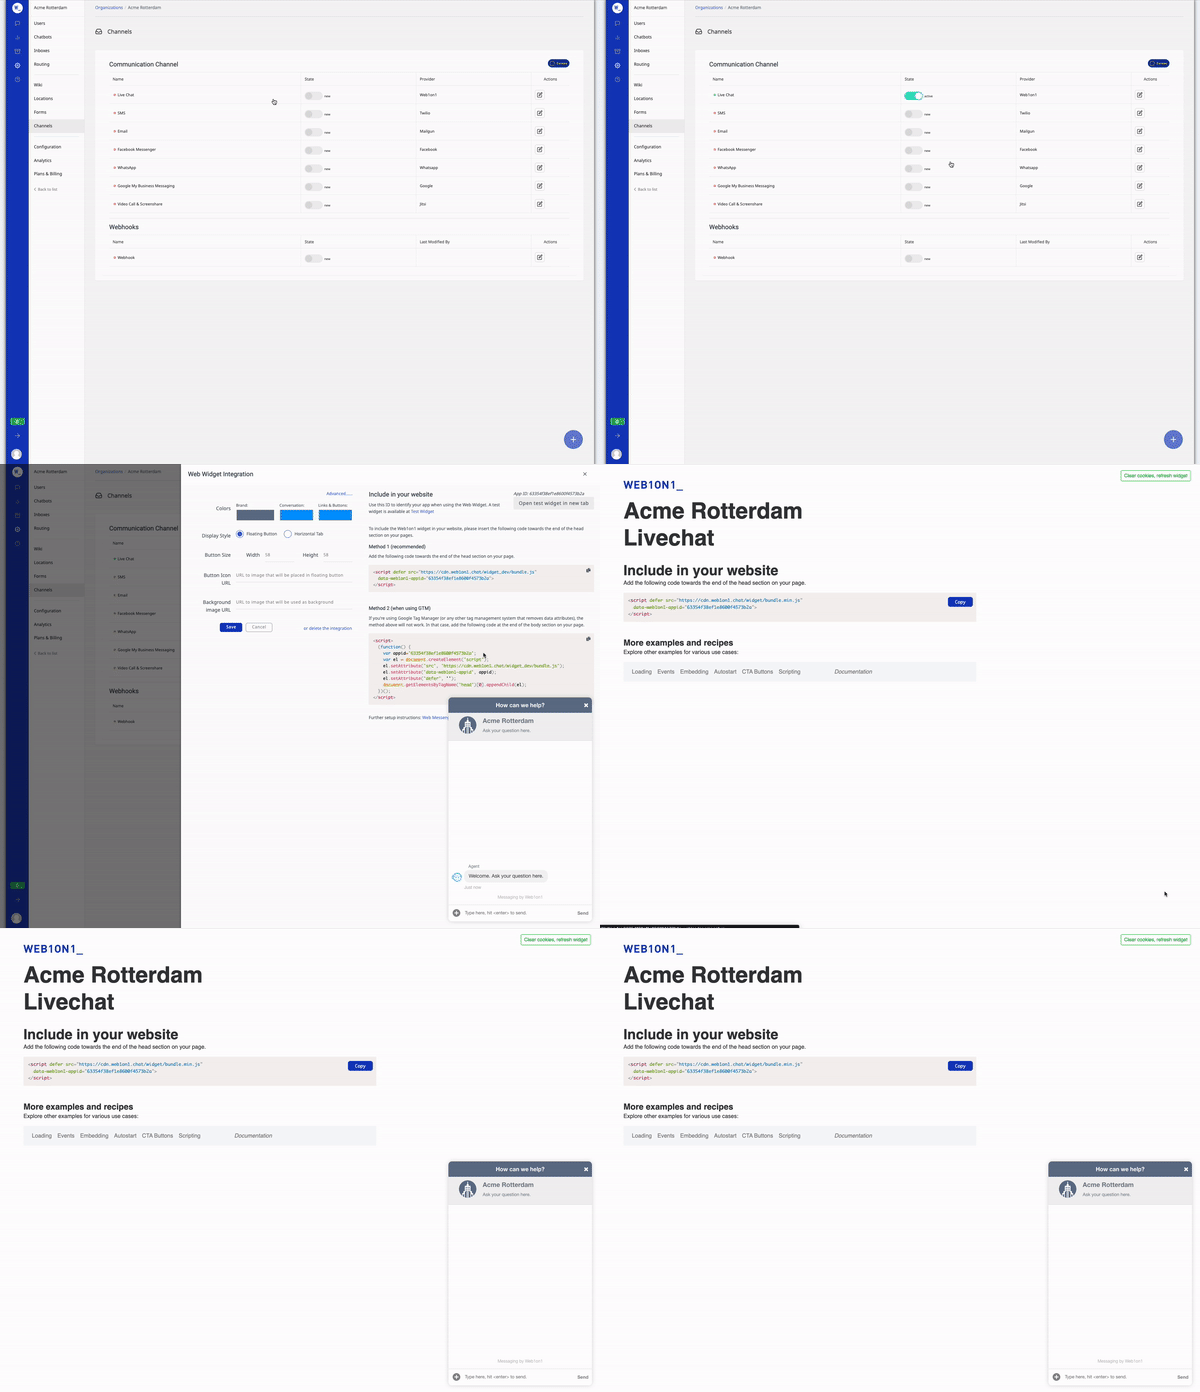
Enable the Live Chat channel from your Channels list.

As you can see in the video, the widget is loaded from within the configuration page. This shows you the changes you made; test the widget by typing a message in it.
Step 2: Add the widget script to your website
Place the widget on your website with this little script, using static script tags:
<script defer src="https://cdn.web1on1.chat/widget/bundle.min.js"
  data-web1on1-appid="YOUR-APPID-HERE">
</script>
Replace YOUR-APPID-HERE with your actual Live Chat app ID.
You can find your appid in the top right of the widget properties panel.
Advanced widget scripts
You can load the widget code in many ways, as we will show next.
Dynamically loaded script tag
When loading the script via Google Tag Manager (GTM), or in similar cases, you have to use a slightly different variant:
<script>
  (function(d) {
    var appid='YOUR-APPID-HERE';
    var el = d.createElement('script');
    el.setAttribute('src', 'https://cdn.web1on1.chat/widget/bundle.min.js');
    el.setAttribute('defer', '');
    el.setAttribute('data-web1on1-appid', appid);
    d.getElementsByTagName('head')[0].appendChild(el);
  })(document);
</script>
This alternative way is needed because GTM removes the data-web1on1-appid attribute from statically-loaded scripts
Once you have placed the script, the web widget will show on your website.
Loading after a delay
Sometimes you might want to load the script after a couple of seconds to make the rendering of the main website improve.
    <script>
      setTimeout(function () {
        var appid='YOUR-APPID-HERE';
        var el = document.createElement('script');
        el.setAttribute('src', 'https://cdn.web1on1.chat/widget/bundle.min.js');
        el.setAttribute('defer', '');
        el.setAttribute('data-web1on1-appid', appid);
        document.getElementsByTagName('head')[0].appendChild(el);
      }, 2000);
    </script>
Do not forget to paste your appid in the code above
Passing widget options
Normally you would disable the shoutout in the Advanced Config Editor in Web1on1. But, if for some reason a customer want to overrule any setting of the Web Widget on there website, they can do this by defining an object on the main window and passing it to the widget like this:
<script>
    window.widgetOptions = {
        shoutout: false
    }
</script>
<script defer
    src="https://cdn.web1on1.chat/widget/bundle.min.js"
    data-web1on1-appid="YOUR-APPID-HERE"
    data-web1on1-options='widgetOptions'>
</script>
You can find your appid in the top right of the widget properties panel.
To make it work in GTM write the second script tag as explained here. Don't forget to add the el.setAttribute('data-web1on1-options', 'widgetOptions'); to it.
Listen to events
<script>
    window.widgetLoaded = function() {
        console.log('widget was loaded and has ' + window.web1on1.getConversation().messages.length + ' messages');

        window.web1on1.on('widget:opened', function() {
            console.log('widget:opened: you could send statistics here')
        });

        window.web1on1.on('widget:closed', function() {
            console.log('widget:closed: you could send statistics here')
        });

        window.web1on1.on('message:sent', function(message) {
            console.log('message:sent: you could send statistics here', window.web1on1.getConversation().messages.length)
        });

        window.web1on1.on('message:received', function(message) {
            console.log('message:received: you could send statistics here')
        });
    }
</script>
<script defer
    src="https://cdn.web1on1.chat/widget/bundle.min.js"
    data-web1on1-appid="YOUR-APPID-HERE"
    data-web1on1-callback='widgetLoaded'>
</script>
To make it work in GTM write the second script tag as explained here. Don't forget to add the el.setAttribute('data-web1on1-callback', 'widgetLoaded'); to it.
Add clickable channels into your shoutout
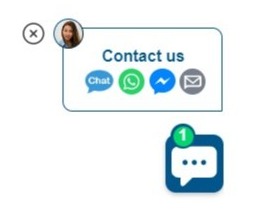
If you are using multiple channels like WhatsApp, Facebook, or e-mail, it's possible to add clickable channel icons into your shoutout.
See example below.

How does this work?
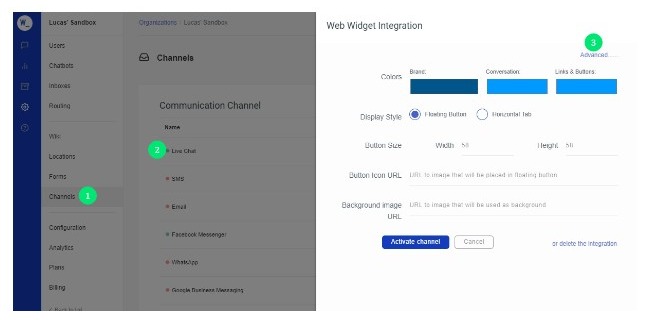
Go to your advanced config settings of your chat widget. See the screenshot below to find the advanced config settings.

Example advanced config settings For each icon you need to add one setting into the shoutoutText setting:
LiveChat <img data-web1on1-open=\"\" src=\"https://storage.googleapis.com/services.web1on1.com/image-dumper/uploads/ChatIcon-removebg-preview.png\" style=\"width:30px;height30px;\">
WhatsApp
<a href=\"https://api.whatsapp.com/send/?phone=%2B**
Facebook
<a href=\"https://m.me/**
E-mail
<a href=\"mailto:
Example
{
    "customText": {
        "shoutoutText": "Contact us <br> <img data-web1on1-open=\"\" src=\"https://storage.googleapis.com/services.web1on1.com/image-dumper/uploads/ChatIcon-removebg-preview.png\" style=\"width:30px;height30px;\">
<a href=\"https://api.whatsapp.com/send/?phone=%2B31612345678\" target=\"_blank\"><img src=\"https://cdn.smooch.io/afa76e83208ceb5dceb04a9985a6bd6b.png\" style=\"width:26px;height26px;\"></a>
<a href=\"https://m.me/384876502908439\" target=\"_blank\"><img src=\"https://cdn.smooch.io/daa5c03e8faf1a1459f0c45da0a49b52.png\" style=\"width:26px;height:26px;\"></a><a href=\"mailto:testmail@citnowgroup.com\" target=\"_blank\">
<img src=\"https://cdn.smooch.io/2ac6b8516c13a96e9562d8b4a00b3194.png\" style=\"width:26px;height:26px;\"></a>"
    }
}
Starting Bots
On page load
<script defer
    src="https://cdn.web1on1.chat/widget/bundle.min.js"
    data-web1on1-appid="YOUR-APPID-HERE"
    data-web1on1-nosound="true"
    data-web1on1-bot='BOTID'>
</script>
Will start the widget, open it immediately and start the bot identified by BOTID - for example, the "Contact Me" bot has id
6050966f00c6e002dc2fbb6e.important We have to add the
data-web1on1-nosound="true"attribute when autostarting bot as otherwise we get soun play error of the browser, because there was no interaction with the client yet. Sound are not allowed before that.
When widget is activated
To start a bot when the widget is activated, call the following function when the widget:opened even is triggered:
web1on1.api.sendClientMessage(`>cs 6050966f00c6e002dc2fbb6e`);A full example is available:
Bot Call-to-Action buttons
Adding the data-web1on1-bot="BOTID" attribute to any dom element on the website where the widget is active, will open the widget and start that bot.
<button data-web1on1-bot="6050966f00c6e002dc2fbb6e">Start the Contact Me bot</button>Will open the widget and start the Contact Me bot if it is configured in the organization.
DOM element examples
Opening the widget
Adding the data-web1on1-open attribute to any dom element on the website where the widget is active, will open the widget
<button data-web1on1-open="">Open the widget</button>Embedding a widget
Use the embedded attribute
<script defer
    src="https://cdn.web1on1.chat/widget/bundle.min.js"
    data-web1on1-appid="YOUR-APPID-HERE"
    data-web1on1-embedded='elementid'>
</script>
Will start the widget in embedded mode on the DOM element with id 'elementid'
Opening the widget fullscreen
<!doctype html>
<html>
    <head>
        <title>fullscreen</title>
        <meta name="viewport" content="width=device-width, initial-scale=1.0">
        <meta http-equiv="X-UA-Compatible" content="ie=edge">
        <script
            defer
            src="https://cdn.web1on1.chat/widget/bundle.min.js"
            data-web1on1-appid="5e16007a4c80460010c2717c"
            data-web1on1-embedded="fullscreen"
            data-web1on1-nosound="true"></script>
        <style>
          #fullscreen {
            position: absolute;
            top: 0px;
            left: 0px;
            width: 100%;
            height: 100%;
          }
        </style>
    </head>
    <body>
      <div id="fullscreen"></div>
    </body>
</html>
We use the embedded mode of the widget to load it inside the div element named fullscreen, and style it with css to be fullscreen.
Opening the widget when clicking on a link
    <a href="#"
       data-web1on1-open=""
       data-web1on1-preventdefault="true"
    >
        Open the widget
    </a>
Adding the data-web1on1-preventdefault= will stop the default link behaviour of going to the website defined in the href attribute.
Open widget when contact goes to a certain page
{
    "urls": [
        {
            "url": "https://some.domain.com/some/page/to/page/",
            "openAfter": 0,
            "agentName": "john",
            "agentImageUrl": "https://some.domain.com/some/john.png",
            "customText": {
                "agentWelkomMessage": "Hi there, how can we help?"
            }
        }
    ]
}
this can be used in emails for example where you want to add a link jumping to the widget on a specific page of your site
Next, let's have a look at the three ways a visitor starts interacting with the widget.
